Where To Find Me:

Etsy: makingtembo.etsy.com
Instagram: @taftisseamstress
Tumblr: taftisseamstress.tumblr.com


Special Questions? Custom Orders (hint hint wink wink)? : makingtembo@gmail.com


Friday, July 29, 2016

Green-Blue-Black-Crazy-Print Dress for Mom's Birthday

It's, you guessed it, that dress pattern I make for my mom at least 4 times a year! I should really give it a better name. 


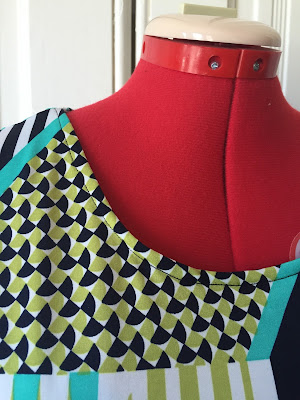
My mom visited Vancouver last year and brought this fabric back for me. She found it at a nice fabric store, and thought it would make an excellent version of these dresses she loves.  


The armholes were finished with bias tape:

A photo posted by Taft Weber-Kilpack (@taftisseamstress) on


However, this is the updated version. When I made my Pi Dress, I altered the shoulder seams so the dress would fit better in the armholes. The top of the armhole seam now sits in the right spot, buutt...


I can definitely do a better job of fitting the top of the side seam the next time I make this. It took a sleeveless version of the dress for me to fully realize this. 


I will also admit to being lazy and just finishing the bottom hem with a straight-stitch. 


But I did serge the inside seams! I promise!


I got super lucky on the back and this one stripe mostly matched up. This print was just too crazy to try to make it match at the seams. I couldn't find any repeating anything, so I crossed my fingers, cut out the pattern pieces, and I guess that mostly paid off!


Back neckline was finished with a piece of grosgrain ribbon, as usual. I'm still using up my stash before I go out and purchase some petersham (still kind of broke, yo!). 


And here it is, ready for final delivery! I even got a little spotlight on my mom's Instagram page:


This post was a few days late, but I swear I have a good excuse! I was traveling in South Africa, blogging for hiveonline.org about the 2016 International AIDS Conference. You can read my youth reporter articles here
See you next week!
Taft WK 

Wednesday, July 20, 2016

Academy of Art University (Summer 2015): Fashion Design

The last post in the series about the classes I took at the Academy of Art University last summer. You can also read about the Fashion Construction and Fashion Drawing classes I took. 

As with all good design projects, we started with a lot of research. I made word maps and tried to sort out what was most inspiring to me, searched tags on Tumblr for images, dug through the image files at AAU's library, and went on a (legit) archaeological dig through my fabric stash. 

After about a week of tossing ideas around, I settled on the dream that had brought me to the classes in the first place. I wanted to make things, learn how to make things better, and make things for other people. I decided to design a collection that represented artists and makers, that was an artist's uniform. 


I brought all my visual research together and made several pages of collage in my sketchbook. (Side note, the plate in the top left corner is from the Heath Ceramics and Alabama Chanin collaboration! My favs!)


After laying down the initial images, I went in with markers, pens, ink, watercolor pencils, and tape to add my own illustrations to the page and highlight certain areas. I also used tracing paper to gather interesting shapes I found in the pictures of artists and makers. 


In many cases, I used my own handprint as part of the art. I wanted a piece of my own maker-ship, of my own hands to be part of the collection. I believe there is something incredibly beautiful and compelling about the handmade and I wanted that to come across in the clothing I designed. 


After creating the collages, I extracted certain colors from the images. 


I noticed that in the two main threads of my visual research, painters and welders, there were different color schemes, and I wanted them to be represented. The color swatches represent a lot of work that is not pictured here: many trials with different mediums, trying to get just the right hue. 


You can see some of the colors I didn't use on the page on the left. 

Then our class moved into sketching and making rough silhouettes. We made about 16, which would eventually be whittled down to between 4 and 6. 


The roughs were drawn using croquis - which I was morally against. The croquis available had illogical proportions and I did not want to use them for my designs. I took the most reasonable looking croquis and filled her out in some places, most notably the thighs and upper arms. It didn't make a hugely noticeable difference, but it was enough that I felt just a little bit more comfortable using them. I still wish I had realistically proportioned sketches, though. 

I also began coloring in my roughs using my basic, preliminary palette. The colors changed from what you see pictured here. 


All the above sketches were rejects, and below are the silhouettes I decided upon. You'll notice they're covered in notes and folded papers, as I combined some outfits together and edited along the way. 


I chose 5 outfits, because I felt I could achieve a good balance in that. 

On the above page on the right, you can see another one of my drafts, where I started moving around colors and design details and testing color swatches until the outfits started feeling like they clicked together when you looked at them. 


And this is my final collection! I chose minimalist makeup and versatile shoes. 


For the final presentation, I also created a color story board with fabric swatches and the buttons that would be used on the coats...


As well as a mood board, which pulled images from the collage and inspiration pages of my sketchbook. 

I had some extra time at the end of the class, so I got a tutorial from my teacher on how to draw flats: 


This was definitely one of my favorite parts. I'm especially fascinated by the technical aspects of fashion design, and drawing the flats allowed me to detail out exactly what I would have wanted the final product to look like. 

Of course, when I had finished designing the collection, I had big dreams that I would mock-up and maybe create some of what I had designed. I never ended up doing that, but I still love several of the pieces and their design details are still on my mental list of Things to Sew (One Day). 

Hope everyone is enjoying their summer! This week, I've also been blogging at hiveonline.org, offering a youth perspective on the 2016 International AIDS Conference in Durban, South Africa. There's not as much sewing mojo as there is here, but you can also hit me up on Twitter @TWKisseamstress or read the articles at hiveonline.org, where we're talking smack about the patriarchy, advocating for women and girls, and empowering youth for sexual and reproductive health and rights! That's also some good mojo. 
-Taft WK

Friday, July 15, 2016

Academy of Art University (Summer 2015): Fashion Drawing

Last week, I posted the first of my 3 posts about the Academy of Art University classes I took last summer. One of the classes I took was Fashion Drawing, which was a little outside my comfort zone at first, but I ended up falling in love with it! This post is very different from what I usually write about, but I feel like I made a lot of progress in the class, so this is worth sharing. 


I learned in this class that the fashion drawing style isn't like regular figure drawing. We weren't necessarily drawing the model/scene as it appeared, we were drawing people to a 9-head proportion (which is a little ridiculous, in my opinion). 


[This piece was for an assignment and inspired by the style of Rene Gruau.]

But we covered a ton of mediums, which I loved!! We started with charcoal and china marker. There was also water color (see above) and ink. Then oil pastels, collage, and watercolor pencil. 


For the final assignment, we took 5 pieces we had drawn in class and re-made them, using new techniques we learned and cleaning up mistakes. 


There were also days when we focused on just one body part or piece of clothing: 


And every night for homework, we drew a few things in our sketchbook, and I caught this quick sketch of Kara before she got up from her nap (and went off to nap in a different location):


My wonderful art teacher at school, Mr. Sanborn, helped me photograph these pieces for my college application portfolio. When he saw the drawing of Kara, he insisted that a picture of a dog be included (which is why I'm also putting it here). 

Hope everyone is enjoying their summer vacation!
Taft WK

P.S. Go checkout hiveonline.org! I'm at the International AIDS Conference in Durban right now, and will be blogging for HIVE from the conference. Not as much crafting/sewing as at this site, but tons of social activism

Wednesday, July 6, 2016

Academy of Art University (Summer 2015): Fashion Construction

Last summer, I took some really fun Pre-College classes at the Academy of Art University in San Francisco. Why am I writing about it a year later? I don't know what to tell you. I really don't. 

I took 3 classes: Fashion Construction, Fashion Drawing and Fashion Design. Each class was 3 hours long and met twice a week, plus homework. So between that and my internship, I barely slept last summer. But that's all fine and cool, cause I had so much fun at these classes! I would spend 10 hours a day, twice a week, at the campus taking classes, and I loved every second of it. 

In Fashion Construction class, there were technically two projects. The first was this messenger bag: 


We went shopping for fabric, but I (of course) bought fabric for a different project instead that I still have not started (of course). The main fabric on this bag was an old shower curtain (we think) that my mom found at a garage sale or something. I used it as a coverlet on the end of my bed, but got tired of it and decided it could have a third life as a messenger bag. 


All the top-stitching was done in purple thread. 


The class provided the pattern, and let me tell you, this bag is HUGE. And very floppy. I used it when I took another art class this past spring, which is why you might see some charcoal marks on it. I'm still trying to figure out the best way to use it. 


The lining fabric is leftover from hemming some curtains. 


And there's these really cute buttons I found at Fabric Outlet! There were about 4 or 5 in different colors, and I used 2 of them on this bag. There was this larger pocket on the inside front and a smaller pocket on the outside back. 


The buttonholes were handbound because the industrial machines in the classroom didn't sew buttonholes. 


I also used some kilt pins to shorten the straps after carrying it around and realizing that my lack of height made the length very awkward. 


Here's the bag flat. 


And here's the side. There's some more pockets on the side, but the bag is so floppy that things often fall out of them. 

I have loved using the bag for some of those quick-grab-all-the-stuff-you-can-find moments before running out the door. It's lightweight and fits just about everything. 

The second project was a knit top. It didn't fit me very well, so I did not end up keeping it. However, another girl in the class and I finished our projects before everyone else, so the teacher let us go to the thrift store and get some clothes to alter. 

I got a short-sleeved chambray shirt, and green pinstriped shirt, and a lacy top. 


I adored the chambray shirt, and it already fit me pretty well. It was just a little plain for my taste. I cut the trim off the lacy top and stitched it to the collar and breast pocket. 


Collar stitched by industrial machine, pocket stitched by hand. 


I trimmed the hem off the chambray sleeves, cut some rectangles out of the lacy top and sewed them onto the ends of the sleeves. 


I also took the pocket off the green striped shirt and hand-sewed that to the sleeve. 


Then I sliced the back in 3 places and inserted some triangles to give the back more of a swing shape. This doesn't look nearly as good on the dress form as it does on a person in motion, so sorry about that. 


The middle triangle is the green stripes and the two sides are the lace. 


(I'm pulling it a little to the side there so you can see what the triangle looks like.)


(and there's the lace triangle)


This shirt is one of my absolute favorites to wear. It's comfy, easy to wash, and so very me! And it's made from second-hand materials, which is always up my alley. 

There are a two more posts coming with projects from my other classes. Stay tuned!
-Taft WK