Where To Find Me:

Etsy: makingtembo.etsy.com
Instagram: @taftisseamstress
Tumblr: taftisseamstress.tumblr.com


Special Questions? Custom Orders (hint hint wink wink)? : makingtembo@gmail.com


Wednesday, May 25, 2016

Braided Rug: Part 2

I wish sewing machines could count mileage. I must've clocked so much time just sitting there, sewing round and round and round...


But it looks so good! The rug got so big that I had to move my ironing board to the floor to iron it. 


I also used my stats textbook to keep the center flat. Who knew education had so many practical uses. 


And this is what it looked like when it was finished! I made sure to get some pictures holding it to give an idea of the scale.


Because all the fabric is braided, there's a really cool texture when you walk on it with bare feet. And the colors came out so well - can you believe this is all recycled materials??


You may have also seen the picture I posted on Instagram as I was finishing the rug: 

A photo posted by Taft Weber-Kilpack (@taftisseamstress) on


From far away, you can't see the stitching, but it starts to pop out as you get closer, which I love! I tried to match the thread as best I could, but it still had great contrast in areas with several colors. 


This is what it looks like in the studio: 


A photo posted by Little Artistas (@littleartistas) on


I just used this technique to make a little bowl too - I think there are more projects like this in my future!

And summer break is starting next week, so I will begin posting every week starting next Wednesday. Hopefully I can actually keep it up for the whole summer this time!
-Taft WK 

Wednesday, May 11, 2016

Braided Rug: Part 1

Over the last year or so, I've had the wonderful opportunity to work at Little Artistas, a children's art studio in my neighborhood. The owner recently hired me to sew them a rug for the studio from recycled fabrics - and it's been so much fun!

I don't have pictures of all the materials, but I started with several balls of strips of fabric in a variety of colors. The plan is to start with the warm colors (pink first) and slowly swap them out with cool colors until we get to gray. 

You might have seen the beginning of the project on Instagram: 

A photo posted by Taft Weber-Kilpack (@taftisseamstress) on

Since then, I've just been braiding and sewing! Thank goodness for my industrial machine, there's no other way we could have sewn this rug without it. 


Here's another picture from Instagram:

A photo posted by Taft Weber-Kilpack (@taftisseamstress) on


I got a batch of extra large needles for my machine - and they're awesome! It made the sewing for this project so much faster because you don't have to worry about the needle breaking. 


Here's all the warm colors....


And we've started to get to the cooler colors!


It kind of reminds me of a sunrise...


There will be another post in a few weeks about finishing this project - I absolutely love how it turned out!
-Taft WK


Wednesday, April 27, 2016

Pi Dress (#nerdalert)

I have a confession to make: 


I bought 3.14 yards of this fabric. I know, I know, it's nerdy on a whole new level. 

I also used (some of) the yardage (cause 3.14 is a lot for me) to make this dress for Pi Day (March 14th):


Here's a sneak peak I posted on Instagram the day before: 

A photo posted by Taft Weber-Kilpack (@taftisseamstress) on

You might be asking yourselves, "Taft, if you made this dress by mid-March, then how come it didn't make it onto your blog until late-April?"

Well, my friends, that's a question I would also love to know the answer to. 


You've all seen this pattern before (it's originally the tunic I made for my mom that I've hacked over and over again). As is standard, no two of these are the same, so on this dress...


There's a curved hem!


It's so cute and sporty, I absolutely love it. Unfortunately, I made it a *little* too short, but there is definitely a longer one of these in my future!


I also got hella lucky at Fabric Outlet and found burgundy fabric that matched the pi symbols perfectly. I used it for contrast sleeves. I originally wanted to do raglan sleeves because I thought it would look better, but I ran out of time before Pi Day :(. 


Sorry about the weird yellow-ish light in these pictures. I took them at a weird time of day when the natural light was not at its best in my dining room. 


I'll let y'all know what other nerdy things I make with this fabric. 
-Taft WK

Wednesday, April 13, 2016

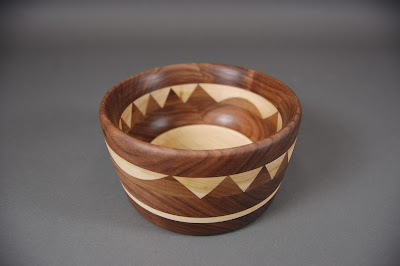
Wooden Bowl with Triangles

This semester I'm taking a Joinery and Turning class in the Wood Shop. For my turning project, I decided to make a bowl that could sit on my shelf to hold my jewelry and other doodads. 

I didn't want to make a plain bowl, so I decided to experiment with some triangles and see what happened. I made a mock-up first (forgot to get pictures, whoops!), but here's some photos of the final process:


I started by cutting out triangular prisms and gluing them together. The woods I used were poplar and walnut. 


Then I sandwiched the triangles between more pieces of wood. After the glue dried, I cut the block into a cylinder on the bandsaw. 


Then it was to the lathe! I started by rounding the outside, then started hollowing out the inside. When I got down to the triangle layer, these really cool patterns started emerging on the inside.  


The triangles on the outside rounded out on the sides, there's more pictures of these later. 


Here's the inside as I worked through the triangle layer. 


Then I got to the last layer of poplar. 


After that, it was mostly touch-ups and then sanding. When I put the beeswax on the bowl, it got a beautiful shine. 


You also might have seen the video I posted on Instagram last week:

A video posted by Taft Weber-Kilpack (@taftisseamstress) on

And here's the super nice photos I took in the photo room: 


I burned my name and the year into the bottom of the bowl, too. 


Stay tuned for more posts about shop projects!
-Taft WK